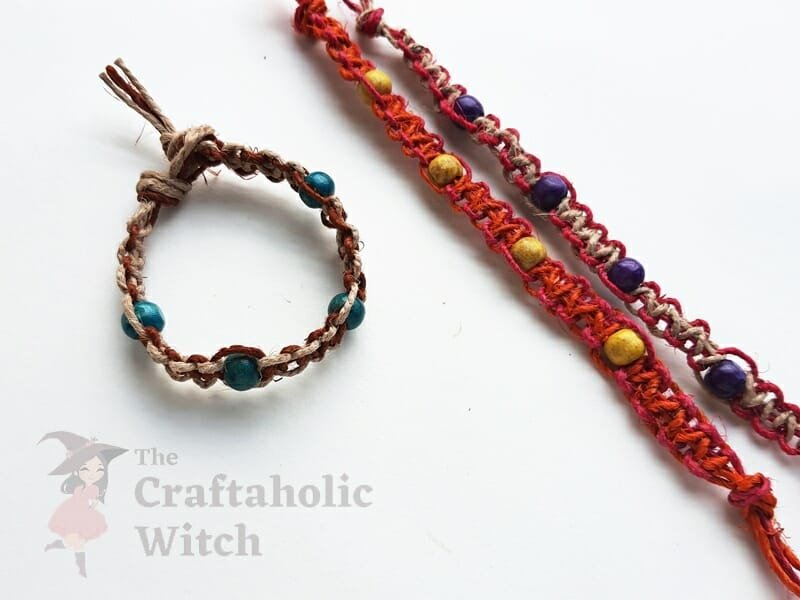
Like cord or strings, hemp is also one of the prevalent materials for bracelet making. And if you can master hemp bracelet patterns, you can create some trendy bracelets for yourself. So we thought of showing you how to make hemp bracelets using the square knot technique.
[lwptoc width=”full”]
Hello crafty people, hope you had a good week. We’ve been sharing DIY bracelet projects lately. So far we have posted tutorials on making bracelets using cords, beads and other popular materials. We noticed there are not many good-quality tutorials on making jewelry using hemp or twine on the web. So we decided to share a beginner-friendly hemp bracelet pattern this week.
There are so many different hemp knot patterns and techniques for hemp bracelet making, and we got confused in choosing one.
After some research, we found square knot patterns are one of the most challenging yet beginner-friendly patterns of hemp bracelets. We believe, that if you can create a square knot using hemp or cord or string, you can effortlessly follow most other hemp bracelet patterns.
Follow our step by step hemp bracelet instructions and learn how to make hemp bracelets and the basics of knotting using hemp. It’s a straightforward project and won’t take much time.

How to Make Hemp Bracelets
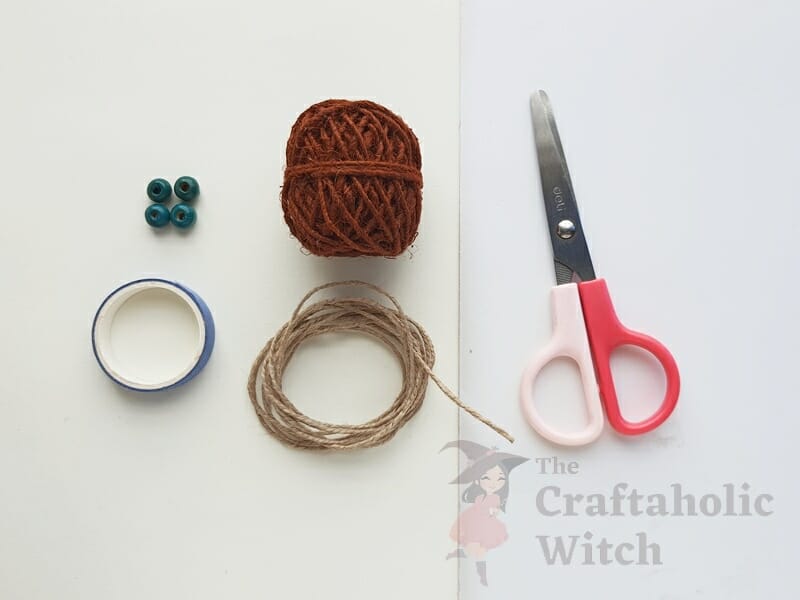
List of Supplies
Materials
- Hemp cord – 2 different colors
- Wooden beads
Tools
- Scissors
- Sticky tape
The cost of making a hemp bracelet using the square knot technique should be around $1. You can purchase a set of 4 different colored hemp cords for $8, each bundle being 29 feet long. With this set, you can craft more than 20 hemp bracelets.
Step by Step Hemp Bracelet Instructions
Step 1: Preparing the Hemp Strings
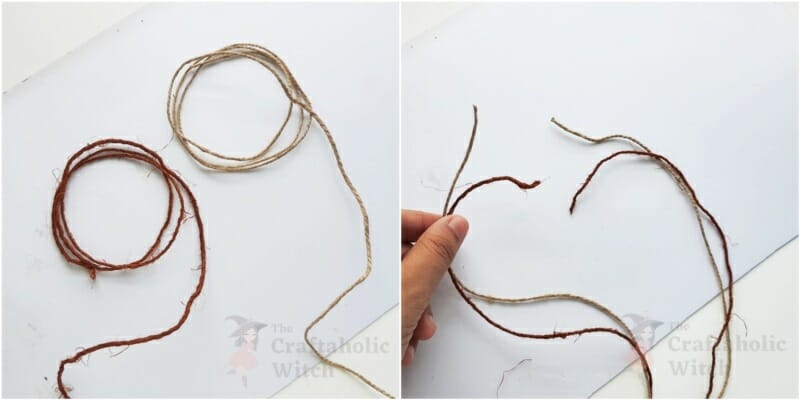
Measure your wrist size. Take a string and wrap the end of the strand around your wrist. Cut the strand where it meets on the other end of your wrist.
Now, measure and cut out 5 or 6 times more than your bracelet length for one colored hemp cord and similarly, prepare another strand from a different colored hemp cord.
Hold both open ends of the different colored hemp cords together.
Step 2: Creating the Loop End
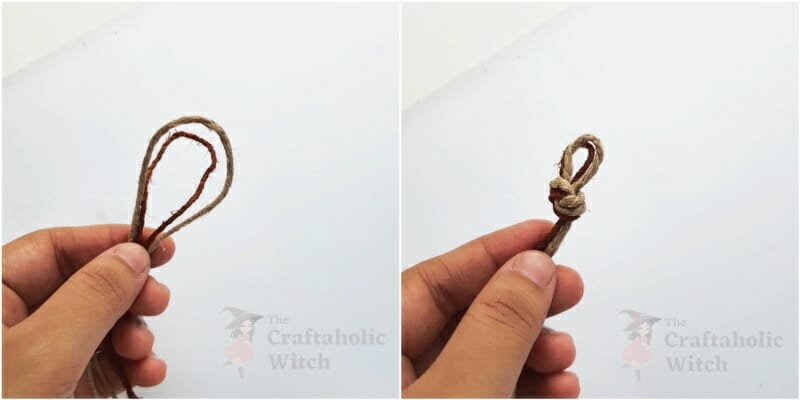
Fold the strands in half, matching their open ends evenly.
Create a knot at the closed end by keeping a small loop at that end. This loop will be the bracelet’s closure loop.
Step 3: Preparing the Strings
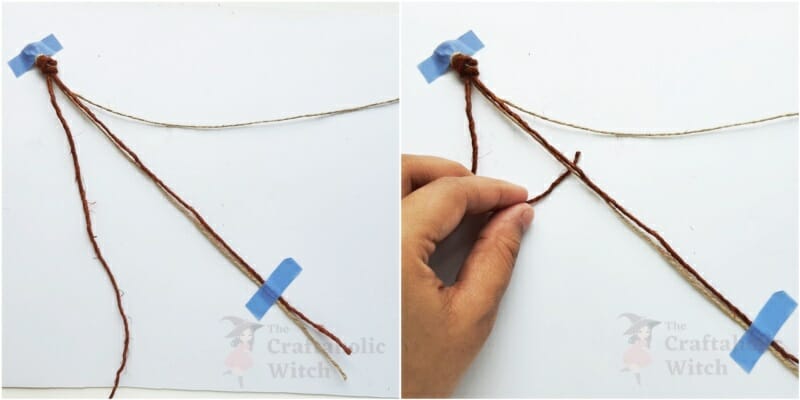
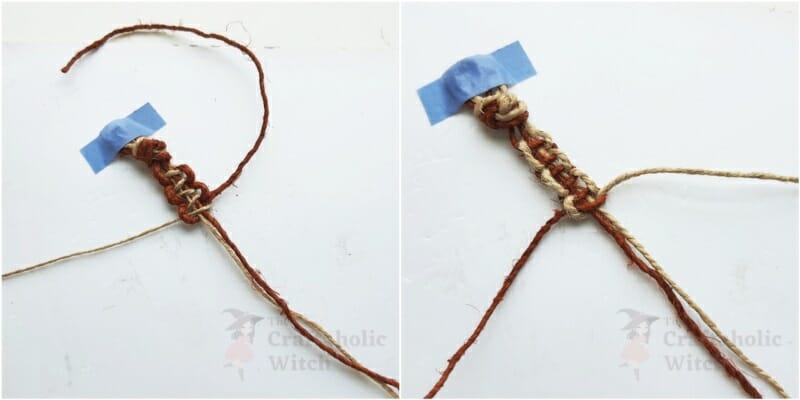
We’re using a shorter pair of strands to explain the square knot nicely. Use a sticky tape to attach the loop to a flat surface. And now, group 2 strands in the middle and fix them on the flat surface with a sticky tape as well. we will work with the 2 strands on both sides (left and right).
Take the left strand and draw it under the 2 middle strands.
Step 4: Starting the Square Knot
Draw the left strand over the right strand now.
Now, draw the right strand over the left and then over the middle strands. Then, draw the right strand through the loop on the left side.
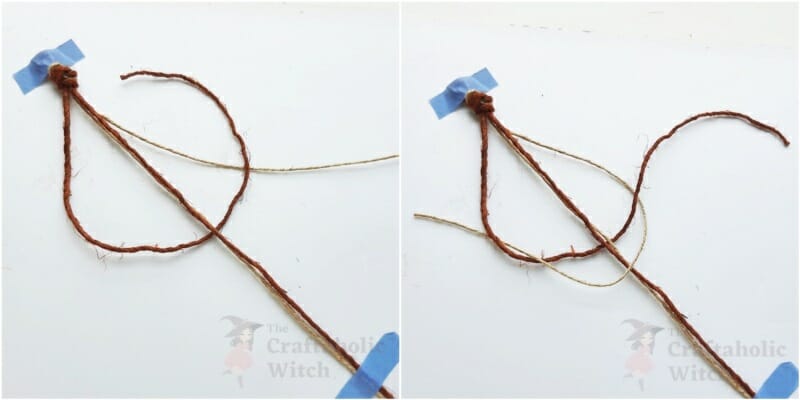
Step 5: Completing the First Square Knot
Gently pull the open ends of both strands and create half of the square knot pattern.
Pull all the way through and give the pattern a nice and tight finishing.
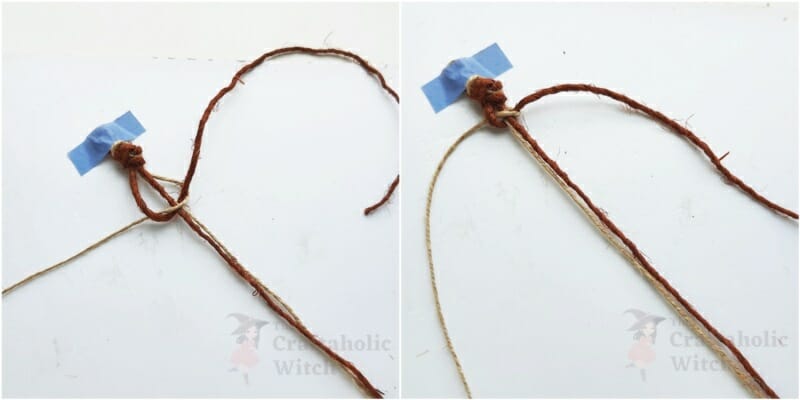
Step 6: Starting the 2nd Square Knot
Now, to create the other half of the square knot, take the right strand and draw it under the 2 middle strands and over the left strand.
Now, draw the left strand over the right and then over the middle strands. Then, draw the left strand through the loop on the right side.
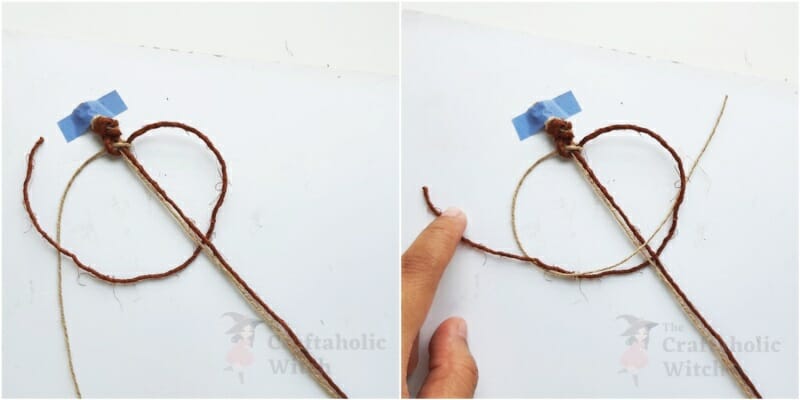
Step 7: Continue Knotting
Pull the open ends of the left and right strands to form the square knot pattern.
Repeat this process a few more times or until you would like to stop to add a bead.
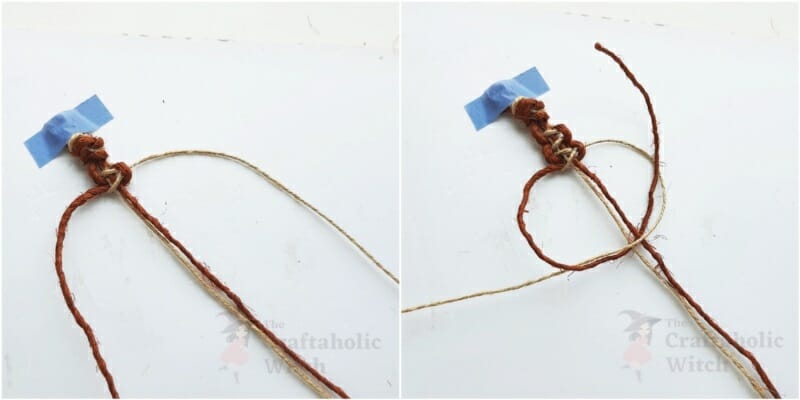
Step 8: Be Careful
Please do not be confused while you follow our picture tutorial.
We used short strands to explain the technique but for the 2nd image of this step, we switched to the original length of strands for the bracelet. There is a slight difference in the pattern as we started from the right side for the longer strands.
Step 9: Add A Bead
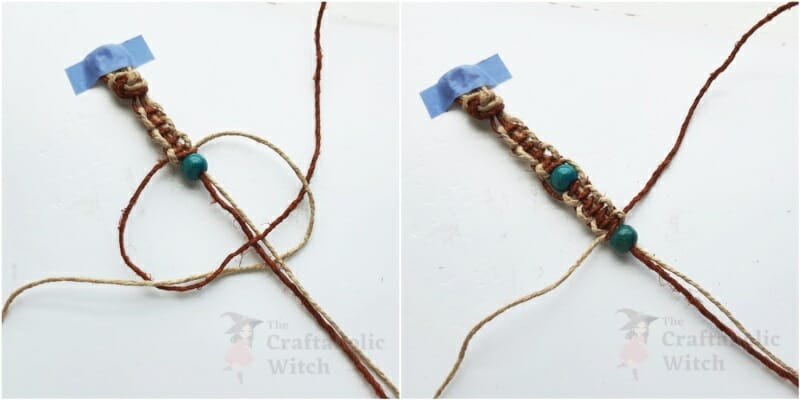
To attach the bead to the hemp bracelet pattern, remove the tape from the 2 middle strands and inert a bead through them.
Push the bead all the way to the square knot pattern.

Step 10: Add 3 More Square Knots And the Second Bead
Tape the 2 middle strands again and continue creating the square knots with the hemp cords.
We are adding a bead after every 3 square knots. You can add a bead at even intervals or random intervals, it’s totally up to you.
Step 11: Continue the Same Process
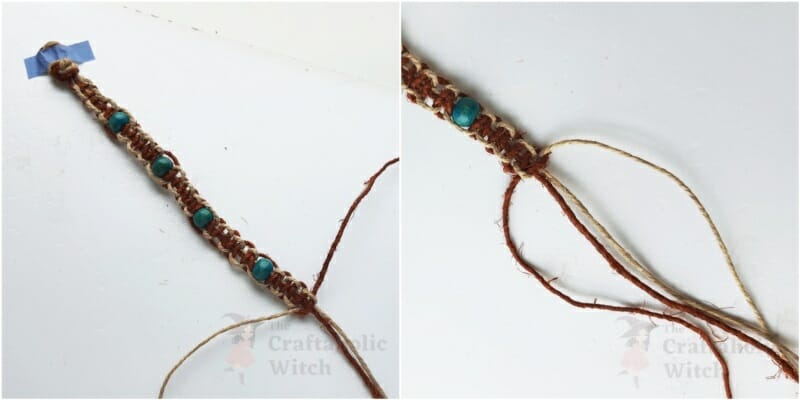
Continue creating the square knots normally as we did before adding a bead. The technique of creating the square knot will remain the same whether you add a bead or not.
Continue creating the square knots and the beading until the length of the bracelet reaches its required length.
Step 12: Finish Knotting and Beading
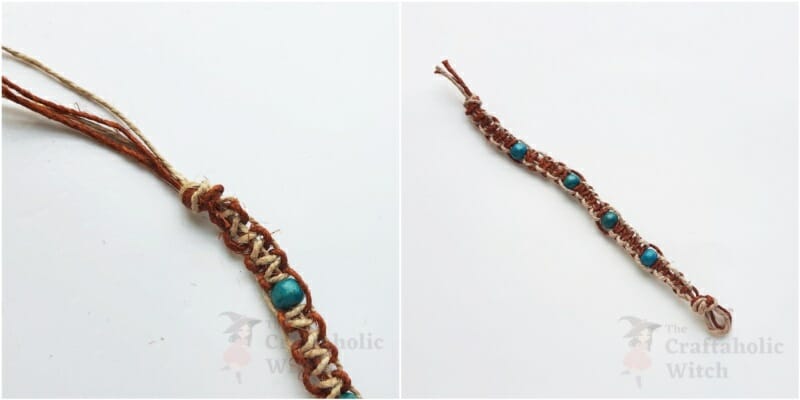
Once it reaches the required length, tie a knot adjacent to the last square knot.
Keep half an inch of the cords leaving the knot and cut off extra cords.
Step 13: Wearing the Hemp Bracelet
You can use the end-knot and the initial loop as the closure of the bracelet. Simply wrap the hemp bracelet around your wrist and insert the end-knot through the initial loop to close the bracelet.
Tips for Beginners: Mistakes to Avoid When Making Hemp Bracelets
Do you want to learn how to make hemp bracelets but have difficulty understanding the steps? No worries, here are some quick tips for you.
- Select 2 different colored cords if you’re planning to learn the square knot for the first time. It will help you understand the technique more clearly.
- Measure your wrist size and then prepare cords 6 times longer than the required wrist size.
- Keep the initial loop small (1 cm max). If it’s too big, then it cannot be used as a closure.
Thank you for reading this far; we hope you have enjoyed our tutorial and learned the basics of making hemp bracelets. I’m saying again, This hemp bracelet pattern is the most basic knot pattern.
We tried to keep our first hemp bracelet as beginner-friendly as possible. Once you learn how to make the square knot pattern, you can easily learn the other hemp bracelet weaving patterns. Use different colored hemp cords and beads to create variation in patterns and designs.
Here are some of our DIY Bracelet tutorials that you may also like
- How to Make a Braided Leather Bracelet
- How to Make Vintage Button Bracelet
- How to Make Adjustable Cord Bracelets
- How to Make Rosary Beaded Bracelet
- How to Make Mixed Beaded Bracelets
Get creative and share a picture with us if you do craft one. If you do re-create, please do tag us on Facebook or Instagram (use #thecraftaholicwitch).
Happy Crafting!

